

How to forward emails to your BaseCloud CRM inbox
BaseCloud CRM allows you to receive emails directly into your CRM inbox, helping you track communications and manage customer relationships seamlessly.
There are two ways to connect your email to the CRM:
- Direct Connection (Recommended)
- Email Forwarding
Option 1: Direct Connection (Recommended)
The easiest way to connect your email is to link your Microsoft or Gmail account directly within BaseCloud CRM. This provides a seamless integration with automatic syncing.
To set up direct connection:
- Go to Settings → Email Settings in your BaseCloud CRM dashboard.
- Click Link Your Microsoft Email or Link Your Gmail.
- Follow the authentication prompts to grant access.
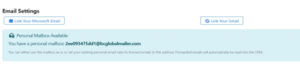
Screenshot: Email Settings page in BaseCloud CRM
Option 2: Email Forwarding
If you prefer not to directly connect your Microsoft or Gmail account, or if you use a different email provider (such as shared hosting), you can set up email forwarding instead. This method forwards a copy of incoming emails to your personal CRM mailbox address.
You might choose email forwarding if:
- Your organisation’s IT policy doesn’t allow third-party app connections.
- You use an email provider other than Microsoft or Gmail (e.g., shared hosting with cPanel).
- You want to forward emails from a specific address that isn’t your main mailbox.
- You prefer to keep your email account credentials separate from the CRM.
ℹ️ Your Personal CRM Mailbox Every BaseCloud CRM user has a unique personal mailbox address. You can find yours in Settings → Email Settings. It will look something like:
2ee093475dd1@bcglobalmailer.com. This is the address you’ll forward emails to. Any emails sent to this address will automatically appear in your CRM inbox.
Understanding Your Use Case
Before setting up email forwarding, identify which situation applies to you. The setup process differs depending on whether the email address you want to forward from already exists or needs to be created.
| Use Case | Description | Examples |
|---|---|---|
| Use Case A: The Email Address Already Exists | You have an existing mailbox (e.g., sales@domain.com) and want to forward a copy of all incoming emails to your CRM. | • A sales team member wants their existing inbox to also feed into the CRM. • You want to track support emails that already go to support@domain.com. |
| Use Case B: The Email Address Does NOT Exist Yet | You want to create a NEW email address (e.g., crm-sales@domain.com) that doesn’t need a mailbox — it should simply forward everything directly to your CRM. | • Creating a dedicated address for leads from your website. • Setting up a department alias that routes directly to CRM without anyone checking it manually. |
⚠️ Important for Use Case B If the email address doesn’t exist yet, you MUST create it as an accepted recipient before setting up forwarding rules. Otherwise, your email server will reject incoming messages with an ‘address not found’ error. See the troubleshooting section for an example of this error.
1. Microsoft 365 / Office 365
If your organisation uses Microsoft 365 for email hosting and you prefer to set up forwarding rather than using the direct connection option, follow the instructions below based on your use case.
⚠️ Important: Enable External Forwarding First Before setting up any email forwarding in Office 365, you must ensure your organisation allows external forwarding. Many Office 365 tenants block this by default. See the “Enable External Forwarding in Office 365” section below before proceeding.
Use Case A: Forwarding from an Existing Mailbox
If the email address already has a mailbox, you can set up a mail flow rule to redirect or copy emails to your CRM personal mailbox.
Step 1: Access the Exchange Admin Center
- Log in to the Microsoft 365 Admin Center at
admin.microsoft.com. - In the left sidebar, navigate to Admin centers → Exchange.
Step 2: Create a Mail Flow Rule
- In the Exchange Admin Center, go to Mail flow → Rules.
- Click + Add a rule → Create a new rule.
- Configure the rule with the following settings:
- Name:
BaseCloud CRM - your_email@domain.com. - Apply this rule if: The recipient address includes…
your_email@domain.com. - Do the following: Redirect the message to… your CRM personal mailbox address (e.g.,
2ee093475dd1@bcglobalmailer.com).
- Name:
- Click Next and then Finish to create the rule.
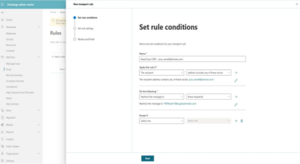
Screenshot: Creating a mail flow rule in Exchange Admin Center
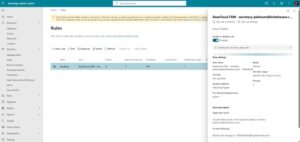
Step 3: Enable the Rule After creating the rule, ensure it is enabled:
- Return to Mail flow → Rules.
- Find your newly created rule in the list.
- If the rule shows as Disabled, click on it and toggle the status to Enabled.
Use Case B: Creating a NEW Email Address for Forwarding
If the email address does not exist yet, you need to create it first so that Office 365 accepts mail for that address. The most reliable method is to create a Shared Mailbox and configure forwarding. Shared mailboxes are free and don’t require a license.
Step 1: Create a Shared Mailbox
- In the Exchange Admin Center, go to Recipients → Mailboxes.
- Click + Add a shared mailbox.
- Fill in the mailbox details:
- Display name: A descriptive name (e.g., “CRM Sales Inbox”).
- Email address: The new address you want to create (e.g.,
sales-crm@yourdomain.com).
- Click Create and wait for the mailbox to be provisioned.
Step 2: Configure Forwarding
- Once the shared mailbox is created, click on it in the mailbox list.
- In the mailbox details panel, find and click on Manage mail flow settings or Mail flow settings.
- Click on Email forwarding → Manage email forwarding.
- Toggle Forward all emails sent to this mailbox to On.
- In the forwarding address field, enter your CRM personal mailbox address (e.g.,
2ee093475dd1@bcglobalmailer.com). - Tick the checkbox that says “Allow forwarding to external email addresses” — this is required for forwarding to work.
- Optionally, tick Keep a copy of forwarded messages if you want emails to remain in the shared mailbox as well.
- Click Save.
Wait a few minutes for the settings to propagate, then send a test email to confirm it’s working.
ℹ️ Why Shared Mailbox Instead of Mail Contact? While Mail Contacts can also forward emails, they don’t always create an address on your domain correctly depending on your Office 365 configuration. Shared Mailboxes are more reliable and give you the option to keep a copy of emails in Office 365 as well as forwarding to your CRM.
Enable External Forwarding in Office 365
By default, many Office 365 tenants block automatic forwarding to external email addresses as a security measure. If your forwarding isn’t working, you need to enable this in the Anti-spam outbound policy.
- Go to the Microsoft 365 Defender portal at
security.microsoft.com. - Navigate to Email & collaboration → Policies & rules → Threat policies.
- Under Policies, click on Anti-spam.
- Click on Anti-spam outbound policy (Default).
- Click Edit protection settings.
- Find the Automatic forwarding rules setting under “Forwarding rules”.
- Change it from “Automatic – System-controlled” or “Off” to “On – Forwarding is enabled”.
- Click Save.
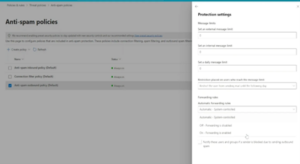
Screenshot: Anti-spam outbound policy settings – change Automatic forwarding rules to “On – Forwarding is enabled”
⚠️ “Automatic – System-controlled” Is Not Enough Even if the setting shows “Automatic – System-controlled”, this may still block your forwarding. Microsoft’s system decides based on various factors and often blocks external forwarding by default. You must explicitly set it to “On – Forwarding is enabled” to guarantee forwarding works.
ℹ️ Administrator Access Required You need Global Administrator or Security Administrator permissions to change these settings. If you don’t have access, contact your IT administrator to enable external forwarding for your organisation.
2. Shared Hosting (cPanel / Plesk)
If your email is hosted with a shared hosting provider such as Afrihost, Xneelo, GoDaddy, or similar, you’ll typically use cPanel or a similar control panel to set up email forwarders.
ℹ️ Good News! With most shared hosting providers, both Use Case A and Use Case B follow the same process. You can create a forwarder for an address whether or not a mailbox exists — the hosting panel handles it automatically.
Accessing Your Hosting Control Panel
- Log in to your hosting provider’s client area or control panel.
- Navigate to cPanel (or Plesk/DirectAdmin depending on your host).
- Look for the Email section.
Setting Up the Forwarder
- In the Email section, click on Forwarders or Email Forwarders.
- Click Add Forwarder or Create Forwarder.
- Fill in the forwarder details:
- Address to Forward: Enter the local part of the email (e.g.,
your_email) and select your domain. - Destination: Select Forward to Email Address and enter your CRM personal mailbox address.
- Address to Forward: Enter the local part of the email (e.g.,
- Click Add Forwarder to save.
Provider-Specific Access Paths
| Provider | Access Path |
|---|---|
| Afrihost | ClientZone → Hosting → cPanel → Email → Forwarders |
| Xneelo | Konsole → Hosting → cPanel → Email → Forwarders |
| GoDaddy | My Products → Web Hosting → cPanel → Email → Forwarders |
| Bluehost | cPanel → Email → Forwarders |
| Hostinger | hPanel → Emails → Email Forwarders |
3. Gmail / Google Workspace
If you use Gmail or Google Workspace and prefer to set up forwarding rather than using the direct connection option in BaseCloud CRM, follow the instructions below.
Use Case A: Forwarding from an Existing Gmail/Workspace Mailbox
If you already have a Gmail or Google Workspace mailbox, you can set up forwarding through Gmail’s settings.
- Open Gmail and click the Settings gear icon in the top right.
- Click See all settings.
- Navigate to the Forwarding and POP/IMAP tab.
- Click Add a forwarding address.
- Enter your CRM personal mailbox address (e.g.,
2ee093475dd1@bcglobalmailer.com) and click Next. - Google will send a verification email to the CRM address. Contact BaseCloud support to obtain the verification code.
- Once verified, return to Settings and select Forward a copy of incoming mail to and choose your CRM address.
- Choose what happens to the Gmail copy (keep, archive, or delete) and click Save Changes.
⚠️ Verification Required Gmail requires verification of the forwarding address before it will start forwarding. A confirmation email will be sent to your CRM personal mailbox. You will find this within the CRM once received.
Use Case B: Creating a NEW Address in Google Workspace
If you’re a Google Workspace administrator and need to set up forwarding for a new address that doesn’t have a mailbox, you can use routing rules in the Admin Console.
- Go to
admin.google.com. - Navigate to Apps → Google Workspace → Gmail → Routing.
- Click Configure or Add another rule.
- Create a routing rule that matches the recipient address and forwards to your CRM personal mailbox address.
- Save and allow time for the rule to propagate (up to 24 hours).
ℹ️ Note for Personal Gmail If you’re using a personal Gmail account (not Google Workspace), you cannot create new addresses that don’t exist. You can only forward from your existing Gmail address. For Use Case B with personal Gmail, consider using a different email provider or upgrading to Google Workspace.
Troubleshooting
“Address Not Found” or Bounce-Back Errors
If you’re seeing an “Undeliverable” message saying the address “wasn’t found”, it means the email address doesn’t exist as an accepted recipient in your email system. This is common when trying to set up Use Case B without first creating the address.
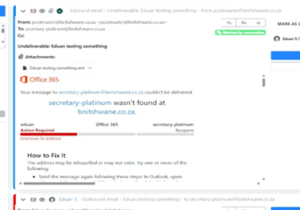
Screenshot: Example of a bounce-back error when the email address doesn’t exist
Solution: You need to create the email address first before mail flow rules will work.
- For Office 365, create a Shared Mailbox with the desired email address, then configure forwarding.
- Refer to Use Case B instructions for your email provider above.
“Your organization does not allow external forwarding” Error
If you see an error message like the one below mentioning “550 5.7.520 Access denied” or “Your organization does not allow external forwarding”, your Office 365 tenant is blocking external forwarding.
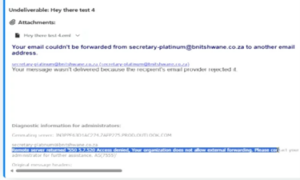
Screenshot: Error message when external forwarding is blocked by organisation policy
Solution: You need to enable external forwarding in the Anti-spam outbound policy.
- Follow the steps in the “Enable External Forwarding in Office 365” section above.
- Make sure to change the Automatic forwarding rules setting to “On – Forwarding is enabled” — the “Automatic – System-controlled” setting is not sufficient and will often block forwarding.
Other Common Issues
If emails aren’t appearing in your CRM inbox after setting up forwarding, check the following:
- Verify the CRM mailbox address: Double-check that you’ve entered your correct CRM personal mailbox address (found in Settings → Email Settings).
- Check spam/junk folders: Some email systems may filter forwarded messages.
- Allow propagation time: Mail flow rules and forwarding settings can take up to an hour to become active (24 hours for Google Workspace).
- Test with a simple email: Send a test message from an external account (e.g., a personal Gmail) to confirm forwarding is working.
- Check rule status: Ensure any mail flow rules are enabled and not disabled.
- External forwarding checkbox: When setting up forwarding on a shared mailbox, ensure you ticked “Allow forwarding to external email addresses”.
Need Help?
If you’re still experiencing issues with email forwarding, please contact BaseCloud CRM support at info@basecloudglobal.com or use the live chat feature in your CRM dashboard.